
Spectrometer Operation Instructions
Collecting NMR spectra using standard parameter sets
When click is indicated below you should use the left button to click unless otherwise indicated. Tabs, buttons, and text entry as well as section titles are in bold text.
- Log in (get your user name and password from Jeff Ellena (jfe@virginia.edu) or someone in your lab).
- Double click on the TopSpin icon to start the app for spectrometer control, data processing and visualization.
- Go to the top, left icon on the TopSpin screen. Open a dataset that contains parameters you wish to use for your experiment. A set of directories containing suitable parameters for popular 1D and 2D experiments for small molecules (< 3000 g/mol) can be found in the setup directory which is in each …/home/labname/nmrdata directory. The directories containing standard parameters for a 1D proton and carbon spectra are h1_1d and c13_1d respectively.
- Go to the command line (just above the status bar at the bottom of the TopSpin window). Enter edc to create a new directory for your experiment. Change NAME and/or EXPNO. If you start with one of the parameter sets in the setup directory be sure to change the NAME. Select Use current parameters. Expand the Options section and set the DIR to the full pathname for your new directory (the directory storage location). Don’t put your data in the setup folder.
- Look at the VTU parameter (sample temperature) at the bottom of the TopSpin window. If you wish to change the sample temperature enter edte on the command line. Set the Target temp. to the desired sample temperature and click Change… if you changed the Target temp. Iconify or close the edte window. Sample temperature range (neptune: 00C to 700C, ariel: -1300C to 1300 see Jeff Ellena (jfe@virginia.edu) before going outside the temperature range 200C to 500C).
- Use the depth gauge to position the sample in the spinner.
- Click on the BSMS Control Suite icon (located in the set of icons near the top of the TopSpin window, put the cursor on an icon to get a pop-up description). Click LIFT.
- Put the sample and spinner into the bore tube at the top center of the magnet. Make sure the sample and spinner will float on the air exiting the top of the magnet before letting go of the sample.
- Click LIFT (in a few seconds the BSMS should indicate Sample: down). Minimize the BSMS Control Suite window.
- For 800: enter atma at the command prompt, this will automatically tune the probe.
- For 600: enter wobb f1 and adjust the appropriate tune and match capacitors at the bottom of the probe (under the magnet) to center the tuning dip on the vertical red line which appears on the monitor and lower the dip minimum so that it is close to the horizontal frequency axis. There are two yellow adjusters for tuning and matching H1 and two analogous blue adjusters for C13. These adjusters are labeled T (for tune) or M (for match). The tune primarily changes the frequency of the dip and the match primarily changes the vertical level of the dip.
- Enter rsh to load a shim file. For 800: Select a file that contains the characters cpstdtube and a recent date. For 600: Select a file that contains the characters rtstdtube and a recent date.
- Enter lock at the command prompt. Select your lock solvent from the pop-up menu.
- Retrieve the BSMS Control Suite window. Click the SPIN button. The SPIN button background will become green when the spinning has stabilized at the spin rate setting (20 Hz).
- Enter topshim at the command prompt, this will automatically shim your sample.
- If your lock level is too high (around 100!), turn down the LOCK Gain using the BSMS Control Suite (remember to click the STD BY button when you are finished).
- (Optional) For fine shimming enter topshim tuneaz.
- Pulse calibration should be done for experiments that will take longer than a few minutes. (see below)
- Enter rga at the command prompt to automatically adjust the NMR signal receiver gain.
- Enter zg to collect a time domain NMR signal. Enter efp to apodize and fourier transform the time domain signal to a frequency domain signal.
- Click the BSMS LOCK On-Off button to change the lock mode to Sweep. Click the SPIN button to turn off sample spinning. Click the SAMPLE LIFT button to eject your sample from the magnet. After you have retrieved your sample, click SAMPLE LIFT again to turn off the sample eject air.
- Exit Topspin.
- Click on the background canvas to get a pop up window then click Leave. Another pop up window will appear, click Logout.
- Go to your lab and transfer your data to your computer or a lab computer for further processing, visualization, and analysis.
Pulse Calibration (for H1 only)
- Enter pulsecal at the command prompt.
How to set up more than one experiment
- Create a directory for each experiment you wish to execute by using the cexp command as described above.
- Go to the directory for the initial experiment you wish to execute by clicking on the appropriate number at the top right of the TopSpin window or opening the directory.
- Click the spooler button at the bottom right of the topspin window and the spooler window will pop up.
- Click on Job in the spooler window and then New… in the New job window that pops up, enter zg and click OK.
- Go to the directory for the next experiment you wish to execute by clicking on the appropriate number at the top right of the TopSpin window or opening the directory.
- Repeat 4.
- Repeat 5 and 4 until all desired experiments are in the spooler.
Further Information
For more information you can obtain a Bruker Avance Beginners Guide for Topspin and many other Bruker manuals at the bruker.com website.
- Go to bruker.com and click the Login button on the upper right.
- Enter email address and click Register for an account.
- When you get an account go to bruker.com and click Login (upper right).
- Enter your email address and password.
- Click the Service button, click User Manuals.
- Click NMR (may need to scroll down to see User Manuals button).
- Click Beginners Guide in Various Languages, go to Avance Beginners Guide for Topspin Users. Click the Beginners Guide button for your favorite language.
- You will notice in the NMR section of the User Manuals that there are many other available manuals.
Collecting NMR spectra using standard parameter sets
When click is indicated below you should use the left button to click unless otherwise indicated. Tabs, buttons, and text entry as well as section titles are in bold text.
- Log in (get your user name and password from Jeff Ellena (jfe@virginia.edu) or someone in your lab).
- Double click on the VnmrJ icon to start the app for spectrometer control, data processing and visualization.
- Go to the top horizontal menu and click on View, then click on Experiment Selector Tree. Double click on PROTON for 1D H1 or CARBON for 1D C13.
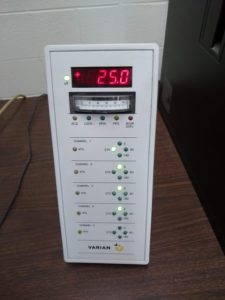 Look at the Varian Status Panel to the right of the computer monitor (Picture 1). The red number at the top is the sample temperature in degrees Celsius. If you need to change the sample temperature go to the Start tab near the bottom of the main VnmrJ window and click the Spin/Temp button. Change the current temperature to the desired temperature and click the Regulate temp button. The temperature is adjustable between 250C and 500 If you need a temperature outside the 25 to 500C range see Jeff Ellena (jfe@virginia.edu).
- Go to the Start tab in the lower central section of the VnmrJ window and click the Sample Info button. Select your Lock Solvent. Also enter a sample name and comments if you wish.
- Use the depth gauge (gold cylinder which is open at one end) to position the sample in the spinner.
- Click the Eject button near the middle of the main VnmrJ window.
- Put the sample and spinner into the bore tube at the top center of the magnet. Make sure the sample and spinner will float on the air exiting the top of the magnet before letting go of the sample. Click the Insert button to turn off the eject air so that the spinner and sample go to the proper position for NMR data acquisition.
- To tune the probe click on Tools in the horizontal menu at the top of the VnmrJ window, then put the cursor on Probe Tuning then click on Auto Tune Probe. The Tune Probe window will pop up.
- If you wish to take a proton spectrum click on the H1 button and wait until the Tuning done: ok text appears near the top and at the bottom of the VnmrJ window. If you wish to take a carbon spectrum click the C13 button in the Tune Probe window to tune C13, wait for Tuning done: ok to appear, then click the H1 button to tune H1. Click the Close button in the Tune Probe window when tuning is complete.
- Load a standard shim file by entering the following on the command line at the top of the main VnmrJ window. rts(‘/home/nmruser1/vnmrsys/shims/autoxdb_current’) su
- Click the Lock button in the Start tab in the lower part of the main VnmrJ window. Click the Find z0 button
- When locking is complete (the box next to Lock should have a check mark and the lock level should be 10 or more) click the Gradient shim button in the main VnmrJ window.
- Click the Spin/Temp button in the Start tab. Set the spin rate to 20 and click the Regulate speed button. If the lock level is at or near 100 reduce the lock Gain until the lock level is 80 to 90.
- Enter ga. A time domain NMR signal will be collected and processed to yield a frequency domain spectrum. Enter aph if phase adjustment is needed.
- Click on the File button at the top horizontal menu of the VnmrJ window, then click on Save As…, navigate to your data directory and then enter a name for the data next to File Name:. Click the Save button.
- Go to the Spin/temp window in the Start tab and click the Spin off button to stop sample spinning.
- Click the Eject button and retrieve the sample and spinner. Click the Insert button to turn off the eject air.
- Exit VnmrJ, click System at the top horizontal menu, click on the Log Out username button to log out.
- Go to your lab and transfer your data to your computer or a lab computer for further processing, visualization, and analysis.
How to set up more than one experiment
- Near the top of the VnmrJ main window you will see a blue horizontal band with some text inside. At the far left side of the band you will see Exp: followed by a number. If the number is not 1 then enter jexp(1) on the command line.
- Go to the Experiment Selector Tree and double click a parameter set for an experiment you wish to execute. Make appropriate adjustments to parameters (ie. number of scans, relaxation delay, etc.)
- Enter jexp(2) on the command line and then repeat step 2.
- Repeat step 3 but increment the number inside the parentheses (ie. jexp(3)) until you have set up all desired experiments. If you enter jexp(X) where X is some number and get a message which indicates the experiment is not accessible then enter unlock(X) and then jexp(X).
- Go back to exp1 by entering jexp(1). Enter go to start the experiment.
- Enter jexp(2) and enter go, experiment 2 will start after experiment 1 finishes.
- Repeat step 6 for all remaining unstarted experiments but use jexp(X) where X is the number of an unstarted experiment.
- After experiments are complete follow the directions in step 16 above to save your data. This should be repeated for all recently completed experiments.