
Adding additional journal articles to your Research Faculty Directory profile
Adding additional journal articles to your Research Faculty Directory profile
Changes to publications being displayed on your Profile pages are done manually inside of https://apps.med.virginia.edu/ResearchFacultyDirectory.
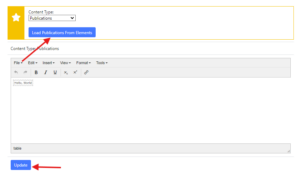
In your profile, at https://apps.med.virginia.edu/ResearchFacultyDirectory, select the “HTML” link on the “Edit Profile:” row.

On the “HTML” page, select the “Load Publications from Elements” button to populate the publications from our database into your profile via the textbox located below the “Load Publications From Elements” button. Options to edit the listing are available. If there are current publications to be added to your list, they must be copied and pasted here. Once your publications are ready, press the “Update” button.
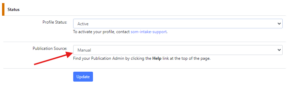
Once the Update button is pressed, your Publications source will automatically switched to “Manual”
If there are further questions or issues, please do not hesitate to contact us.